| Not A Team Player - Dec 29, 2025 | ||||
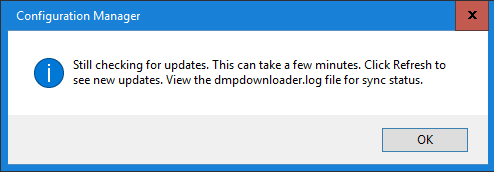
 Apparently 'tis the season....for things to break. Got back from a well deserved Christmas break and fired up MS Teams on my work PC only for it to crap out with a pretty image and generic error message. Normally Teams is pretty solid and I haven't had many issues since I've been using it, so this was somewhat suprising. I tried the usual stuff, exiting out, going back in but the message kept coming up. It worked on my iPad, so I knew it wasn't something with my account or on the 'backend' that was the problem.
Alright, so off to Google I went looking for the answer... Eventually I came across a really long thread and buried at the very end of it was a simple solution which worked for me:
After doing that I re-ran Teams, logged on with my account and it's been running fine ever since. Happy Holidays! |

| Fun With WinSCP - Oct 12, 2025 | ||||
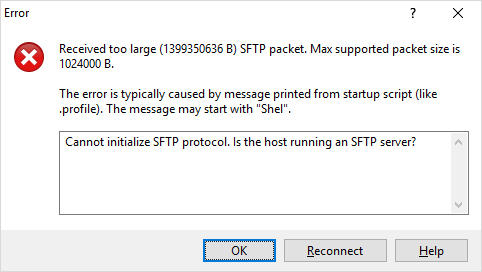
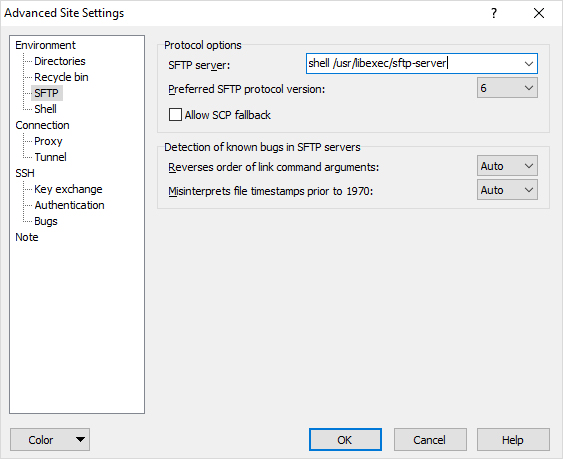
 Support for vSphere/ESXI version 7 ended at the beginning of the month. So I'm currently in the process of upgrading our environment to version 8. First step in doing so is getting our two vCenter sites upgraded. I did a bunch of research and watched a few videos on YouTube and it seemed pretty straightforward. However one video recommended first running a pre-upgrade diagnostic script on your vCenter installs to do a bunch of checks and flag anything it finds which might cause issues during the upgrade. After I downloaded the script I needed to transfer it to the first vCenter appliance. I've always used WinSCP to transfer files to any of our non-Windows servers, so assumed I'd just do the same once again. However, when I went to connect I got this error message:
After scratching my head for a bit and doing some searching I came across an article that provided the solution. In essence the issue is that the default shell for VCSA is not 'bash'. There is a VMWare article that advises you to change this default shell every time you want to copy a file with WinSCP and then change it back again, but frankly that seems to be a bit ridiculous. A better approach is to simply create a new WinSCP connection and change where it looks for the sftp-server binaries. To do so, in the New Connection dialog, specify the username and password, then click on the Advanced button.
Now you should be able to connect (Note you do not need to do this when connecting to the ESXi hosts). After copying and running the script it flagged that our URL paths to VMWare's update locations were no longer valid. Apparently at some point Broadcom dropped the original URLs in favour of new Broadcom specific ones - I had been wondering considering it had been awhile since I saw it showed any new updates available. To rectify, there is yet another script you can download. After running it all the paths were updated properly. From there I downloaded the latest v8.x version of the vCenter Appliance, ran the setup from the GUI subfolder and the upgrade proceeded as expected. Next up is to upgrade our ESXi hosts. Happy upgrading! |
| Apple Watch Woes - Nov 12, 2024 | ||
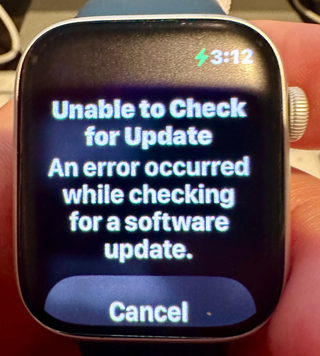
 The wife ended up getting an Apple Watch several months ago to replace the FitBit she had which was starting to show it's age. As we're an Apple household fully immersed in the Apple universe of iGadgets it made sense to upgrade to it. I never really got the appeal when it first came out. The biggest knock being I've never worn watches - but beyond that I was happy with either my iPhone or iPad. And I found it hard to believe you could do anything useful with such a small screen. But ever since she's had it she's been happy with it, even if she mostly uses it to check her messages and close out the rings on the fitness app. She does intend on using it's various features more in the future however. Maybe the Apple stores have classes or courses that they put on. We'll have to look into that. All that said, I asked her a few days ago if she's updated it - having just gone through updating the iMac, Apple TV, my iPhone and my iPad to the latest OS updates that came out recently. To which she replied, she didn't know how to do that. So I did some quick Googling and it looked pretty straightforward so I offered to do it for her.
...and was instantly disappointed when it failed and displayed the error message above. More Googling followed and it seemed like this was a common occurence. I tried all the suggestions from various forums such as Reddit and even Apple's own documentation - suggestions like trying a reset, unpairing and re-pairing with your iPhone, disabling Bluetooth and using your iPhone as a hotspot for Internet connectivity and on and on. Eventually I did come across a Reddit post that said to make sure your iPhone was running the latest version - having just upgraded it to iOS version 17.7.1 I knew that wasn't the issue (I also noted the watchOS was at version 10.6.1). However further down in the thread someone said that you actually had to be running iOS 18 on your iPhone. While I am good at keeping everything updated for patches, I tend to not hurry and install the latest major new release as soon as they come out. I've been burned to many times in the past doing that. But 18.1 came out not long ago, so all the major bugs should have been squashed. So off I went and updated her iPhone to it, checked her watch again, and this time instead of the error message it showed me that WatchOS version 11.1 was available. I followed the prompts to accept the EULA on the iPhone and it proceeded to install the update and is now fully updated. I don't know why you have to use your iPhone in order to update your watch. I'm guessing that maybe because the phone has much more storage it uses it to download the update and install it from there. But there may be other reasons. In any event, the moral of the story is that if you recently purchased an Apple Watch and want to update it, make sure your iPhone is at least running version iOS 18. |
| Mystery Message - Feb 10, 2024 | ||
 A couple weeks ago I noticed a weird pop up in the bottom right corner of my TV screen when watching Apple TV. I've never seen that before, so was a bit confused. I had recently installed the latest available update on my Apple TV (ATV) so I assumed it was some new feature that came with the update. I did a bunch of Googling and found multiple posts on how to turn off Notifications on it - but that's not what I was seeing. I mucked around with the ATV remote but could not seem to get the message to display regardless of what button combinations I pressed.
Finally I stumbled across a post on Reddit (thank God for Reddit) that explained what was going on. It wasn't my ATV at all that was displaying the message, it was my Sony Bravia TV that it was connected to. After grabbing the Sony remote and pressing on the center button the popup changed to 'Notice of termination of functions'. Clicking on that revealed the message: We have decided to discontinue the following functions on this device as of April 2024. We apologize for any inconvenience this may cause. - Screen casting to the TV from YouTube and Netflix apps - Network content in broadcast categories, and video categories such as YouTube in the Discover screen After that the pop up no longer appeared. As I never use any of the features of my 'smart' TV none of this mattered to me. And it seems to be specific to the Bravia smart TVs as I have another AppleTV hooked up to another Sony which is a non-Bravia model and never saw the message on it. Mystery solved! |

| This 'n That - Oct 16, 2023 | ||
 Couple of quick tips here... First up, post-pandemic a large number of people are still working from home and remoting into their computers at the office. As such, Remote Desktop Protocol (RDP) has been an invaluable method of accomplishing this. I've even started using the RDP client for the Macintosh lately as it's straightforward and works well. It allows me to connect using one of my iMacs located in different areas of the house instead of being forced to sit at my PC in my home office all day. Lately however - and this has happened using both Mac OS and Windows - I've found that suddenly the Taskbar and the system I'm remotely connected to is 'hidden' by the local Taskbar of the system I'm using to connect via RDP. No matter what I do, the local Taskbar won't auto-hide. This makes life miserable as you're then forced to exit fullscreen mode and scroll to the bottom of the RDP window to be able to see the remote Taskbar. Thankfully the solution is quite simple:
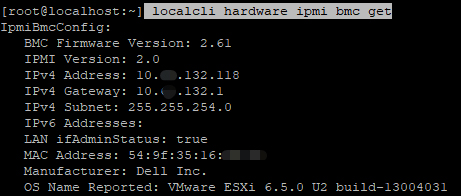
For the next tip, recently I was working on one of our VMWare ESXi servers. I had previously setup iDRAC (Dell's remote access card) on it, but had misplaced what IP address I had given it. Without it, I had no way of connecting to the iDRAC. Being that it was running ESXi, going to the Desktop and running System Administrator as I would on a Windows based server wasn't an option. As I didn't want to have to drive into the office to log on locally and reboot into the Lifecycle Management Controller to determine the info I tried to see if there was a way to find out the information remotely.
Once again, the solution was relatively simple. As shown above, you just need to SSH into the system and run the command 'localcli hardware ipmi bmc get' and amongst all the info returned is the IPv4 address. Once I had that I was then able to connect to the iDRAC as I normally would. You've got to like it when the solutions to various tech issues turn out to be quick and easy! |
| Solar Generator - Aug 20, 2023 | |||||
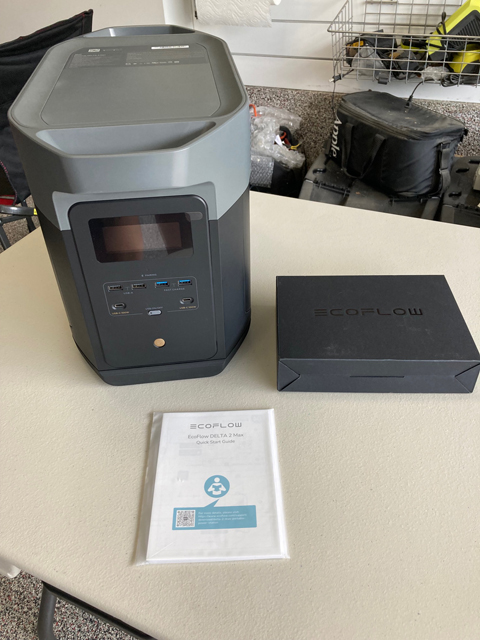
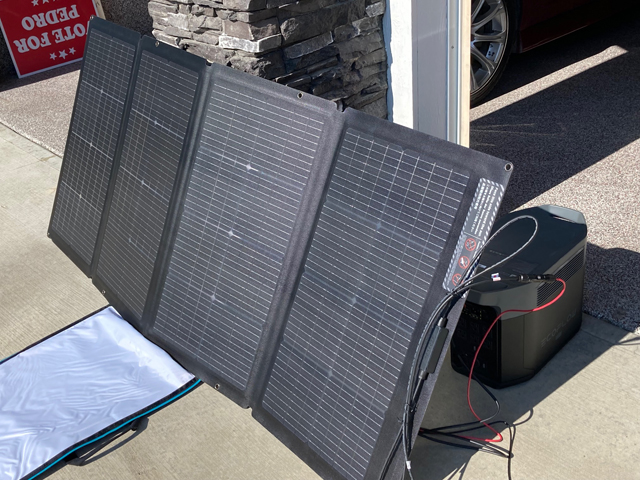
 Thankfully where I live we don't get a lot of power outages. And when we do they tend to only last a couple of hours. But we had one last year that put the bug in me to get better prepared should we ever find ourselves without power for an extended period - either due to rolling blackouts, natural disaster, a Carrington Event, or the big one - global thermonuclear war. It wasn't so much the duration that really annoyed me, it was the time of day. We woke up with no power and I couldn't even make a cup of coffee which is automatically the first thing I do when I get up. While some might scoff at the 'horror' of not being able to have my morning cup of Joe - the Wife can easily attest to how absolutely miserable I am when I don't get one. Thankfully our neighbour had a gas powered generator and fired it up and brought some over in a Thermos and saved the day. Fast forward to now and with climate disasters becoming more frequent and the rising tensions between various nations I figured it was probably a good time to look at getting something for when the SHTF. That said, I didn't want a gas generator as not only are they noisy and smelly, but in a real emergency having to rely upon gas isn't good for the long haul. Recently I started watching a lot of 'Prepper' content on YouTube and as such came across a number of reviews on Solar Generators. Obviously with solar you have an unlimited source of energy to recharge the device. After doing a bunch of research I decided on going with the EcoFlow Delta 2 Max. It had great reviews and looked well designed with a number of useful features. I took advantage of Prime Day on Amazon and found a terrific bundle package which included the generator as well as a 220W solar panel kit - and saved $500 - in the end paying roughly $2500CDN. As an aside, it looks like this is now sold out.
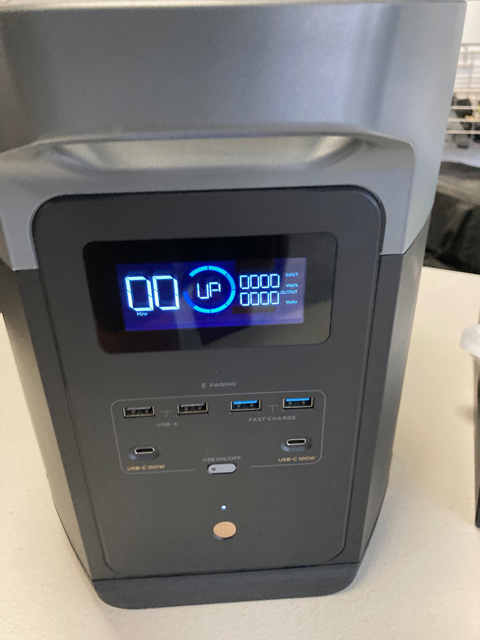
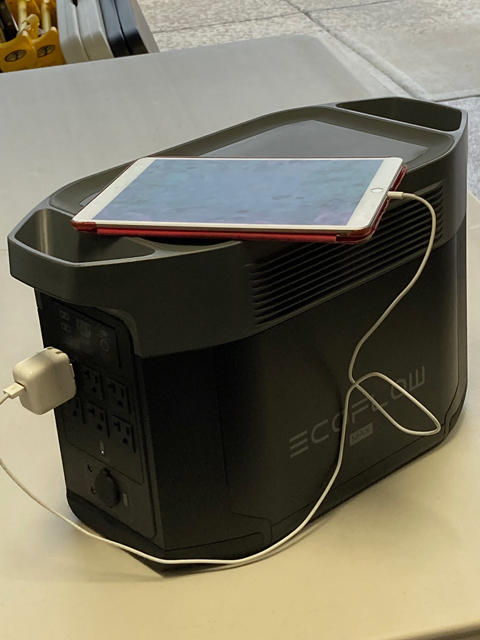
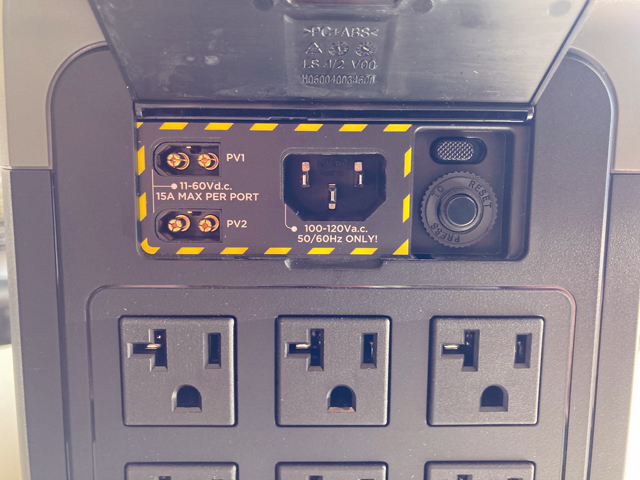
After it showed up I took it out of the box and in addition to the usual warranty cards and instructions it also came with a power cord and car charger adapter. Note, it's very clear that you need to use that specific power cord when charging even though it looks just like a regular power cord. The packaging for the solar panels included the folding panel, a carrying case, the solar to XT60i cable, user manual, and snap hooks. The first thing I did was to update the firmware. As with any electronic device it's always a good idea to update it as newer firmware fixes numerous bugs and occasionally offers new features. To do so you need to download the EcoFlow app on your iPhone (and assuming also available for Android), pair your phone with the unit, and then tell it to update to the latest firmware. The process took only a few minutes and displayed 'UP' on the LCD panel while it installed. I then put various loads on it to test and run down the battery- it turns out I can run my small fan for 40hrs or our freezer for 16hrs. After the battery had drained a bit I hooked up the solar panel (it was a nice sunny day) to it to charge. I let it run an hour and made note of what percentage of charge was recovered. Then I unhooked it and did the same, but charging instead with the AC power cable. Based on my tests it takes roughly 8 hours to charge with the solar panels and 1 hour to charge with the AC cable. The front of the unit contains various USB charging ports, while the back contains regular power plugs in addition to the solar and AC charging ports. On the side there are connectors you can use to connect it to an optional expansion battery pack. The generator isn't light - I would call it 'luggable' - but it has handles on the front and back which makes moving it around fairly easy. I've also ordered an EMP bag for solar generators that has military grade protection and that's where the generator and panels will live when it's not in use. Hopefully that extra protection will never need to be tested but for now it'll let me sleep easier at night. Overall I'm very happy with this purchase. |
| TPM Issues - Apr 5, 2023 | ||
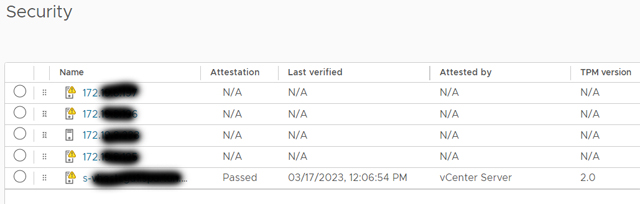
 Got a new batch of servers recently to act as our upgraded VMWare hosts. We're replacing our old servers which are Dell PowerEdge R740's with PowerEdge R750's. Note that the 750's came with ESXi 7U3 preinstalled. After adding it in vCenter I noticed the first issue. It was throwing up an alert stating 'Host TPM attestation alarm'. As these were the first servers that came with TPM installed, this was new territory for me. TPM standing for 'Trusted Platform Module' - essentially the servers now come with a dedicated security chip that ensures amoungst a number of things that the boot sector cannot be altered by malware. So off to Google I went searching for a solution. Most of the articles I found said you have to enable TPM Security in the Bios, but when I checked it was already enabled. There was a second setting often mentioned called Intel TXT, but that was also enabled. Eventually I came across an article that contained the missing piece - you need to also go into the TPM Advanced Settings in the Bios and set it to use SHA256 as the algorithm (SHA1 was the setting enabled). After doing that and booting I went into the Security settings in vCenter and it now showed the new host as having passed the TPM checks and running v2.0 of the TPM protocol.
So I was happy in that I was able to get it figured out relatively easily, but what I still don't understand is why wouldn't have the correct settings set in the Bios when they're shipping systems preinstalled with ESXi! In any event I can now bask in the full security goodness that the new servers come with. |
| New iMac - Feb 3, 2023 | ||
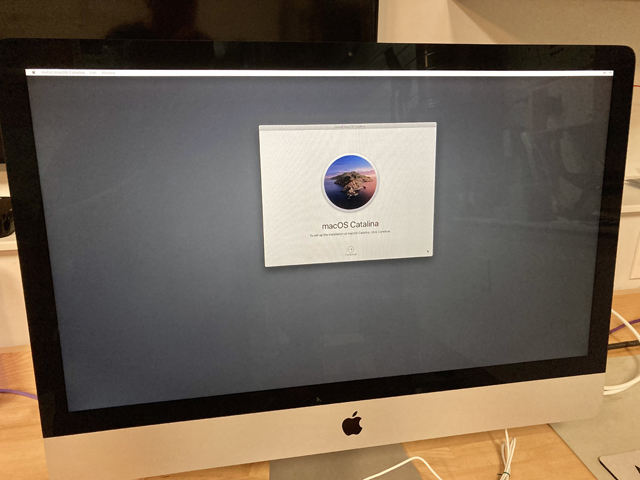
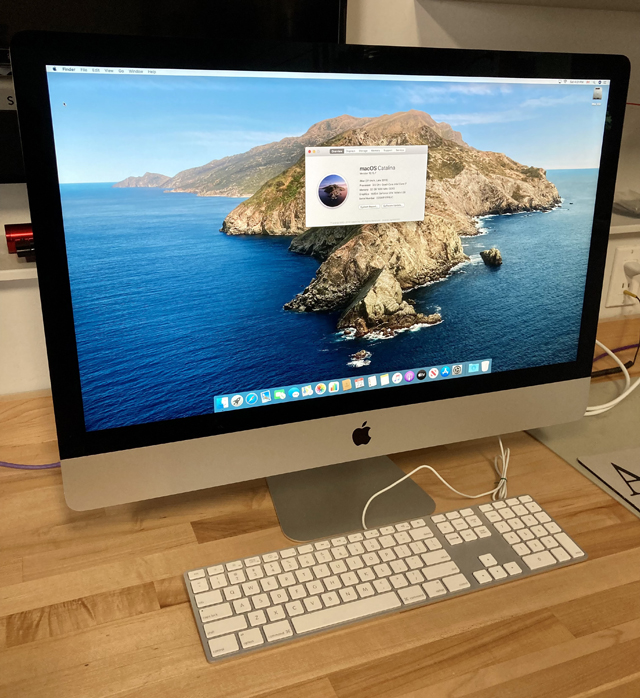
| So I finally got around to upgrading to my new(er) iMac that I had bought several months ago. I've had my main iMac forever - around a decade - and it has served me well. The only issue I ever had with it, which I documented previously on here, is the hard drive crapped out and I ended up replacing it with a SSD drive. But I happily could have kept on using it. At the time it was released it was the fastest model available - in fact it was a custom build order as the video card in it was a special upgrade. So why did I move to a newer model? It was running macOS Catalina and Apple published the last security update for it awhile ago. As it's my primary computer for everything I do, including banking, I didn't want to be running on an OS that wasn't going to be secure anymore. Yes, technically I could have upgraded it using the various hacks available online, but let's face it, at over 10 years old it was time to move on. If I only wanted longevity out of my choice, I would have gone with the Apple M1 based model versus one of the Intel models as at some point Apple will stop supporting Intel based systems. But I absolutely hated the new design. I also could have gone with perhaps the recently released Mac Studio which is frankly an odd offering sitting somewhere between the Mac Mini and the Mac Pro. But I really like the shape and design of the iMac. It is in my opinion the absolute perfect form factor. So when Apple announced they were no longer going to make iMac's that made up my mind and I scrambled to snap up one of the last Intel models before they all sold out. Once again, I got the fastest Intel model that was available (excluding the one-off iMac Pro). The biggest upgrade from my former system was the 5k display. It also had more than double the CPU cores and twice the memory with a much faster video card. The only negative was the hard drive was only 2TB vs the 3TB one that I had installed previously.
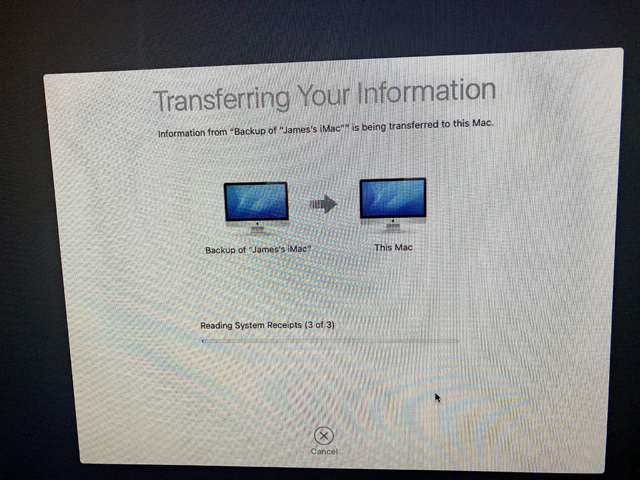
Apple makes the process of migrating all your data a fairly straightforward process. I had previously used my external hard drive which held my Time Machine backups to do another upgrade, so I was somewhat familiar with the steps. One thing I did have to do first though was buy a Thunderbolt 3 to 2 adapter as the new iMac came with the faster standard. With adapter in hand I connected my external hard drive to the new iMac and went into the Migration Assistant. I told it I wanted to transfer from computer to computer and then was stuck as when it searched for other sources it didn't see the attached drive and the backups on it. Then I realized this process only works if the backup and the new system are using the same version OS. But I was going from Catalina to Monterey. Thankfully Migration Assistant also allows you to do computer to computer transfers using either Wifi, Firewire, or Ethernet. Initially I was lazy and just had it use the WiFi connection. I knew it'd take awhile, I though maybe overnight, but I wasn't in a hurry. However not long into the transfer it gave me an ETA that was like 5 days away. So in the end I just directly connected the two computers using an Ethernet cable and it was able to complete the migration in roughly an hour. I've been using it for a few weeks now with no issues. When I check for updates it gives me the option to upgrade to macOS Ventura so I know I'll be able to continue to keep current for awhile longer. Hopefully the OS that follows Ventura will continue to support Intel models, but we'll just have to wait and see. |
| MDT Error - Jan 20, 2023 | ||
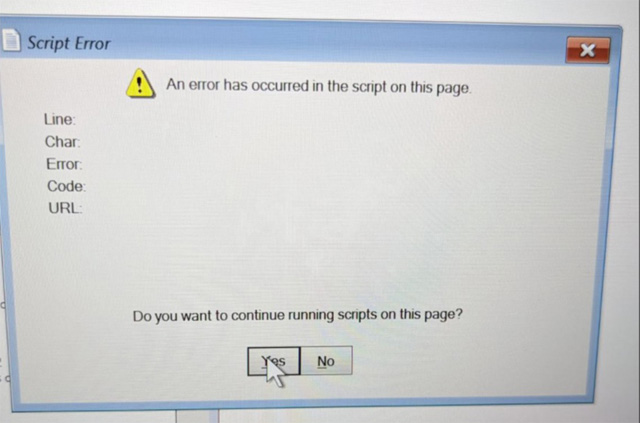
| Although Microsoft Deployment Toolkit (MDT) is no longer really supported by Microsoft, it's still popular and in use by many organizations mostly because it's free and relatively simple to use. Recently I wanted to capture and add an image for Windows 10 22H2 and after my first capture attempt crashed and burned I figured I should probably update the version of Windows Assessment and Deployment Toolkit (ADT) that was installed with MDT. So I downloaded the latest version which is actually the Windows 11 versions - both the ADK itself and the Windows PE add-on. After uninstalling the existing versions and making note of what install options I had previously selected, I installed the newer versions, regenerated the boot image and updated the LiteTouch image in Windows Deployment Server (WDS) as we PXE boot to access the image install menu. I had just finished doing that when I got a call from one of the technicians saying that while imaging a system they got a strange Script Error message. I then tried to image a system and sure enough got the same error. Thankfully I always save a backup of the existing LiteTouch boot image so I had the option of rolling back to it. But off I went searching Google to hopefully find a solution, and sure enough I found it listed under the official Microsoft document titled 'Microsoft Deployment Toolkit known issues'.
To fix this issue, in MDT, backup up the following file: C:\Program Files\Microsoft Deployment Toolkit\Templates\Unattend_PE_x64.xml and modify it as follows: <unattend xmlns="urn:schemas-microsoft-com:unattend"> After saving you'll need to completely regenerate the boot Image(s). Once that was done I went into Windows Deployment Server and replaced the existing LiteTouch image with the newly generated one and from that point on no more script errors! So even though it's not longer officially supported they thankfully are still tweaking it and fixing errors as they occur. |
| RSAT Issue - Nov 13, 2022 | ||
| Had a request from a newly hired Administrator to grant them access to Active Directory. Of course one way to do that is to give them the password of an admin account and have them log locally onto the Domain Controller. But that's not best practice - best practice is to install the required tools on a hardened client system instead. Ok, so what tools are needed then? Thankfully Microsoft has created a suite of tools called RSAT, or Remote Server Administration Tools. You just need to install it on a client and assuming your account has the required permissions you can pretty much do any administrative task without needing to log onto the server itself. You used to be able to download the tool directly off the Internet, but in October of 2018 Microsoft instead included it as an Optional Feature in Windows 10. According to MS, to install it now all you need to do is this: Instead, just go to "Manage optional features" in Settings and click "Add a feature" to see the list of available RSAT tools. Select and install the specific RSAT tools you need. To see installation progress, click the Back button to view status on the "Manage optional features" page. So I sent all this info to the Admin expecting the issue to be resolved. Instead he got back to me saying he couldn't install it. So I grabbed my Laptop and sure enough, was able to reproduce what they were seeing. While attempting to install the tools it would throw an error. Off to Google I went and while there were several articles highlighting similar problems, it took me awhile to find one that had the solution. In our environment we use SCCM or Microsoft System Center Configuration Manager. Instead of end users installing their own monthly Windows updates, we use SCCM to push out updates we authorize to their systems. As part of this mechanism it uses Windows Server Update Services or WSUS which is essentially an on-prem database of the updates MS publishes. Instead of clients going out over the Internet to update they instead point to this internal server.
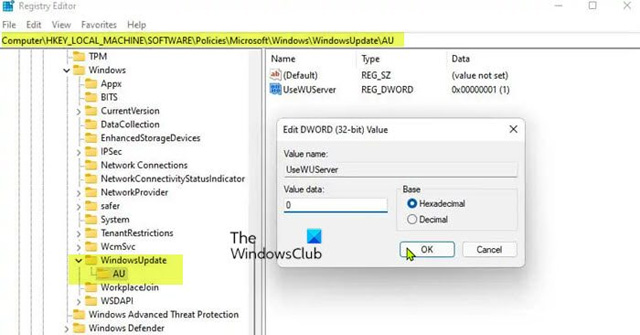
And that creates a problem as it prevents clients from going out and installing these Optional Updates. So after going through several different 'solutions' the one that actually solved the problem and worked in our environment was a simple registry change: HKEY_LOCAL_MACHINE\SOFTWARE\Policies\Microsoft\Windows\WindowsUpdate\AU
I sent this to the Admin and he verified that it allowed him to install RSAT. Afterwards I had him change the registry entry back as leaving it would break SCCM from being able to install updates. So a very specific fix in our case, but one I suspect many large organizations will encounter. |
| Bits 'N Bytes - Jul 29, 2022 | ||||
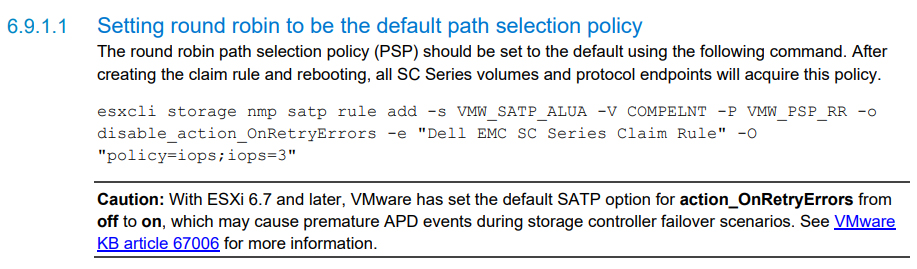
| Couple of different issues this time... First up, I had recently upgraded our VMWare hosts to ESXi v6.7. Things were fine for about a week and then suddenly we had a handful of VM's all running off a particular datastore that ended up hanging up. Turns out the problem was a 'known issue' with the software version our SAN was running. After contacting Dell they had me upgrade the SAN OS to a slightly newer version and since then the problem seems to have been resolved. But while troubleshooting I came across this note in Dell EMC's best practices guide for their Compellent SANs. In particular the note about VMWare changing the default setting for action_OnRetryErrors starting with version 6.7. So I followed the link and found out that this new setting value was known to cause issues with Compellent SANs.
Ok, as per the article I'll just change the existing policy right? Well, how do I do that as apparently there's no way to modify an existing policy. Apparently you have to delete it and then recreate it. So how do I delete it?
I was then able to enter the command as shown in the best practice guide successfully. Next up, I was told I had to import 500 users into an existing Exchange Distribution List (named SAP Sales Cloud) and given a corresponding Excel spreadsheet with the list of names. Not wanting to do this manually I figured there must be a way to automate it and after some Googling found out it's shockingly easy to do.
Later on I was then asked to export the list of users in the Distribution List so someone could double check all the required users were there. Once again, shockingly easy to do so:
In computing you can almost always find a technical way to solve whatever problem you're encountering. The trick is to come up with the correct syntax and modify it to fit your environment. |

| iDrac Woes - May 25, 2022 | ||
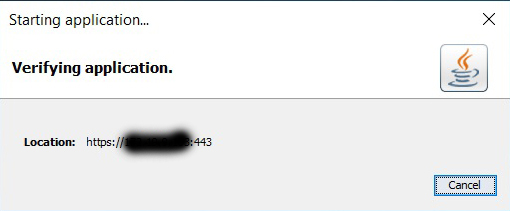
| Had a server that was misbehaving so I connected to its iDrac - which is Dell's remote access solution. It's a daughtercard that gives you full control over the server even if the server is hung or powered off. This particular server is a PowerEdge R930 which is a 13th generation server. As such, it's iDrac console is still Java based which is always a pain. Newer generation servers use HTML5 and ditch Java altogether. But usually everything just works - assuming you've added the iDrac IP into the Java security Exception Site List. However this time, of course when I needed remote access to the server console the most it wasn't working. It'd just hang at 'Verifying application.' I tried every browser I had to no effect. Tried connecting from different client systems to no effect. And finally I resorted to searching Google. Thankfully I came across the solution.
Someone had posted they were having this exact issue and they got it working by clearing their Java cache. So I tried that and sure enough it worked for me as well! To clear your Java cache:
Now once again, I'm able to access the local console on my 13th generation servers via the iDrac. |
| Linux Box Upgrade - Nov 19, 2021 | ||||||||||||||||
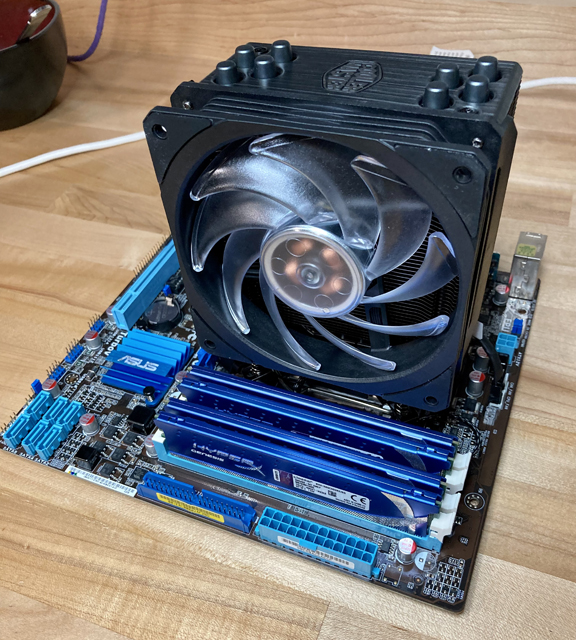
 When I first started playing around with Linux I installed Mint on an ancient system I had cobbled together from spare parts. It consisted of an Asus motherboard, ATI Sapphire graphics card, high end Duo Core cpu and fancy (for its time) DDR2 memory. Suprisingly Mint ran just fine on it. No driver issues and everything was pretty snappy. Granted I wasn't using it for anything more than just kicking the tires and some web surfing, but I was quite happy with the setup. The only real issue was I couldn't get it to Sleep properly. Likely due to some issue with the motherboard chipset or the graphics driver or combination of both. Fast forward to a few months ago and I started running into problems. The Adaptec Raid card I was using to run the SAS hard drive started getting flaky and on powering up would occasionally lose the configuration and I'd have to go into its config menu and recreate the proper settings. And then not long after that my SAS drive failed outright. At that point I decided maybe it was time to upgrade to a (slightly) newer platform. As before, I wanted to try and do it on the cheap with older hardware. So I sourced a newer Asus motherboard and an Intel i5 CPU and some more Kingston HyperX memory, this time however being DD3 Dimms. For the video card I didn't want another ATI/AMD card as on Mint you end up using a generic driver. With Nvidia based cards you can use the proper drivers for them and I also hoped that'd fix the sleep issue I had before. In the end I found a brand new Nvidia Quadro card for only a few hundred dollars. While that went against me trying to do things on the cheap the fact that only a few years ago the same card was selling for close to $2000 was such a good deal for such a powerful (and still single slot) card that I couldn't pass it up. For the hard drive I gave up on using SAS which really more at home on a server system and not natively supported on PC motherboards so I went with a Samsung Sata based SSD. And here we come to the part which reinforces why I only build these systems once and then use them for as long as technically feasible. Building a new system is always a pain in the ass. You inevitably run into issues and you never know which component is to blame. Faulty memory? Faulty motherboard? Faulty CPU? Obscure Bios setting that needs to be changed? SSD drive not compatible? Did you over tighten the CPU cooler? etc. etc. etc. The first problem I encountered after assembling everything is I could not get the Mint installer to boot. Didn't matter if I tried from a burnt DVD or from a bootable USB stick. The system would always hang at the Bios splash screen. Finally I stumbled across an obscure post on the Internet where someone had the same issue and they resolved it by disconnecting the hard drive cable which allowed them to boot off the USB stick and then reconnect the hard drive and were then able to install the OS. That didn't make alot of sense to me, but I tried it and sure enough it worked. I now had a working system with the latest version of Linux mint installed. The next problem was with the memory. As I had used the same brand previously, I figured I'd go with them again for this build. I always thought they looked pretty sleek with their shiny blue heat spreaders and splashy logo. Before I was only running 8GB, but this time I wanted to max out my memory. This newer Asus board supported up to 16GB, so when I ordered everything I got four 4GB dimms - one for each slot. However, once again things would hang at the Bios splash screen. Thankfully the Mint installer also included a memory test utility. Imagine my shock when I fired it up to discover that all my Dimms weren't the same. Despite being ordered as a set, and despite the label affixed on each Dimm being identical in terms of part number, they were different! Some were showing as running at 1600Mhz, some at 1333Mhz. And some also had a *XMP affixed at the end of the description. So off I went and ordered more memory. And once again, not all the Dimms were the same. But at least now I had hobbled together enough physical sticks that I could properly match them up. But again, even with four Dimms rated at 1600Mhz the system would hang. Eventually I found a little blurb in the motherboard manual that stated something along the lines that XMP memory was designed for only one Dimm operating in each channel. Which meant I wouldn't be able to have more than 8GB of memory. Eventually I just stuck in 2 Dimms, one in each memory channel, went into the Bios, told it they were XMP enabled and it immediately queried the memory and set the ideal timings for them. After that everything was fine. I still only had 8GB, but at least they were operating at much faster speeds, and by virtue of being XMP enabled got an additional performance boost as well.
My Linux box is now using technology roughly a decade old (other than the hard drive & video card) versus the previous setup which was roughly 15 years old. My CPU is a newer generation, memory is much faster, hard drive significantly faster, and best of all the sleep function now works properly! Although unlike on my Windows PC, I can't click the mouse or hit the keyboard to wake it up. Instead I have to push the power button on the Chassis, but that's not really a big deal. Finally, I forgot to mention I also went with a newer CPU cooler. In addition to having fancy LED lighting it is whisper quite compared to my previous cooler which was super noisy. As always it was an adventure getting everything working but now that things are up and running I'm extremely pleased. Hopefully this build lasts for many years to come. Specs:
|
| Control 4 Upgrades - Oct 7, 2021 | ||||
 We've been running Control 4 at our house since it was built, going on 10 years now. Last year our Doorstation failed. Although the chime still sounded you no longer got sound and video from it. It's possible I screwed it up when I was power washing the stucco above it one day - perhaps water got inside the unit. In any case Control 4 no longer sold that original model so we'd have to upgrade to their newer Doorstation 2 model. To be honest I preferred the look of the new one, but was concerned as the physical size was different. Thankfully they also sell a conversion bracket/kit so that it'll fit in the opening of the older one. One variation has a keypad which typically would be used for someone entering a passcode and in order to open the door, but we didn't need that, so ordered the version with just a blank inset instead. We also had some other C4 related things to be done so we scheduled a technician to come and do all of it at the same time. Our Apple TV was one of the older (pre-HD) versions and getting long in the tooth so we decided to upgrade it. However there were concerns if we went to the latest 4k version that there'd be issues as it uses a newer HDMI version 2.1 standard, while our C4 matrix switch due to its age only supported the older 1.x standard. As a result I ended up buying the Apple TV HD. It would give us increased longevity in supporting newer OS releases longer, offering a faster processor and more storage - and as it uses HDMI 1.4, it would still be compatible with our C4 system. The latest Control 4 OS is version 3.x, but we're still on the older 2.x version. Unfortunately we can't upgrade as most of our wall mount touch screens are the older version and aren't compatible. We could upgrade them, but they're hellishly expensive. At some point my beloved Panny plasma will die and we'll be forced to go to a 4k TV which will usher in a slew of required upgrades. At that point we'll bite bullet and upgrade everything - matrix switch, Blu-ray player, Apple TV, touch screens, and the C4 OS. So we couldn't upgrade to the latest, but we could at least upgrade to the last supported 2.x version - which in our case turned out to be 2.9.1.
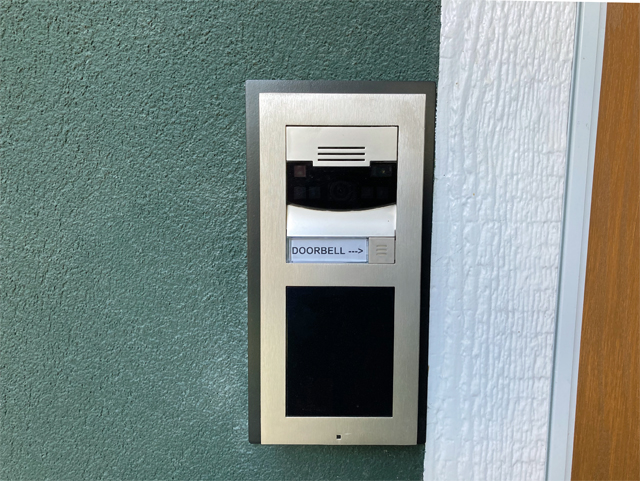
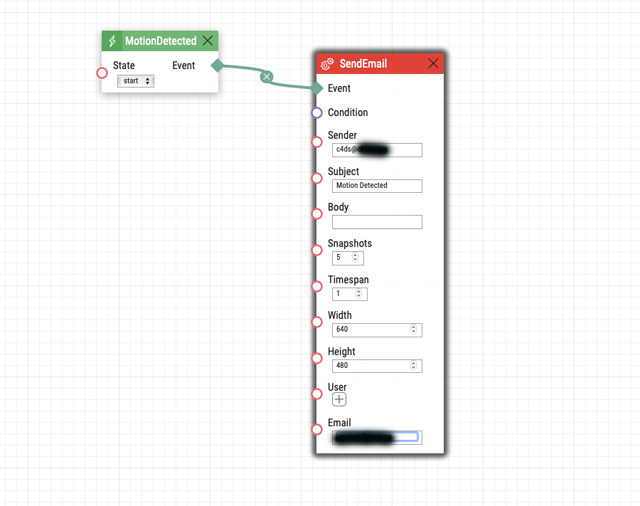
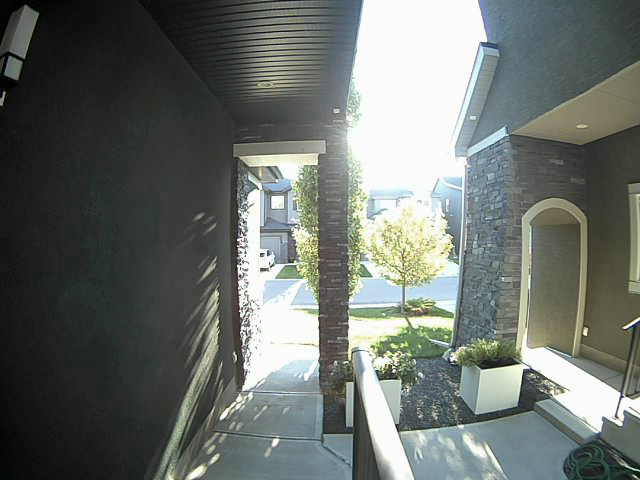
On the day of our appointment the technician showed up and set about replacing and programming our new Apple TV and upgrading the C4 OS. All that went well and was straightforward. The problems started when he replaced our doorstation with the new model. It briefly worked in that when someone pushed the doorbell the camera feed would automatically pop up on the touch screens, but shortly afterwards it stopped working and despite spending several hours he couldn't get it working again. So we had to wait a few weeks for them to come back to look at it again. Several more hours of effort ensued including them putting in a call directly to Control 4 support. Finally they got it working. Turns out the issue was that soon after being powered on, the unit tried to auto download and install the latest firmware. But for some reason it kept failing and this forced the unit into an endless loop and resulted in unstable operation. After manually upgrading the firmware everything started working properly. Afterwards I logged into the web interface and went about doing some simple programming. Currently it's set to send me an email with screenshots when it detects motion on the walk way leading to our house and also to send an image when someone presses the doorbell. This is an ability we didn't have with the original Doorstation. The camera image is also much improved. The only negative is the new model looks so space age it's not obvious to some people what to press for the doorbell. Thankfully there's a plastic slot you can remove and put a label in - in our case we printed one that says 'Doorbell --->' which points to the adjacent button. As of now everything is working fine and we're happy with the upgrades. Home automation is terrific when it works, but a nightmare when something breaks or you're forced to do an upgrade which typically results in a cascade effect of required upgrades. |
| Chipping My Car - Sep 15, 2021 | ||||
 So I'm not exactly a gearhead by any stretch of the imagination. But recently I decided I wanted to 'chip' my car - my beloved Pontiac G8. Chipping your car is when you buy a 3rd party accessory that modifies the factory default settings. Usually this is done to turn off various features or to enhance engine performance. In my case I simply wanted to disable GM's Active Fuel Management (AFM) technology. As my engine is a V8 with 8 cylinders, AFM will monitor your driving and turn off half the cylinders when not needed. Typically this happens when cruising or when taking your foot off the gas. The intent was to improve fuel economy, but everything I've seen online in various forums indicates the savings are marginal at best. For me however, I found that when it makes the transition from activating to deactivating (turning on all cylinders) there's a slight but annoying pause before it kicks back to full power. As my car's warranty has long since expired I figured there was no harm in doing some mucking about. From what I found online there seems to be two types of devices to chip your car. The first one which is about half the cost is a dongle which simply plugs into your cars ODB-II port - a diagnostic port all cars have had for years. The other kind will reprogram your car's computer. As manufacturers routinely warn people that doing this will void your warranty these devices allow you to save your existing configuration so that when you need to take your car back to the dealer for maintenance you can restore it and they'll be none the wiser.
In my case, as I simply wanted to turn off AFM and not muck with any other settings I opted for the cheaper dongle option. After searching the forums I came across a product that had good reviews and whipped out the credit card and ordered online (there a spot on the website where you punch in your car make/model and it will verify if it's compatible or not). When it finally arrived I opened it up and was somewhat dismayed that other than a company catalog and a sticker there was no instructions. Thankfully they're not needed. You simply plug the dongle into the port. When you start the engine a blue LED will light up and blink and then turn off and that's it. To verify it was working I went into the car's Engineering Mode which displays various diagnostic information - including the state of the AFM system. At first I didn't think it was working as I took 'All Active' to mean that AFM was active. I also figured at idle sitting in the driveway it wouldn't be using all cylinders. After doing some more research on the forums I found out that's not the case. And 'All Active' means all cylinders are active. So with the dongle unplugged I enabled Engineering Mode and drove around the neighborhood. I was able to see it change from 'All Active' to 'Deactivating' to 'Half Active' and back again as AFM kicked in and out depending on what I was doing. I then put the dongle in, and did the same test. This time however it constantly displayed 'All Active'. In addition, I could tell it was working based on how the car was responding to my driving. So overall I'm extremely happy with my purchase. While I can't quite compete with the guy across the street and his McLaren Spider at least my car is now running at its full V8 potential at all times. |


| iMac Resuscitation - May 24, 2021 | ||||||||||||
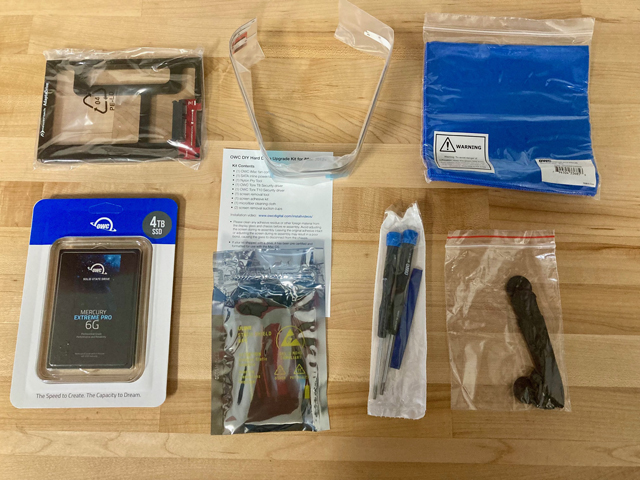
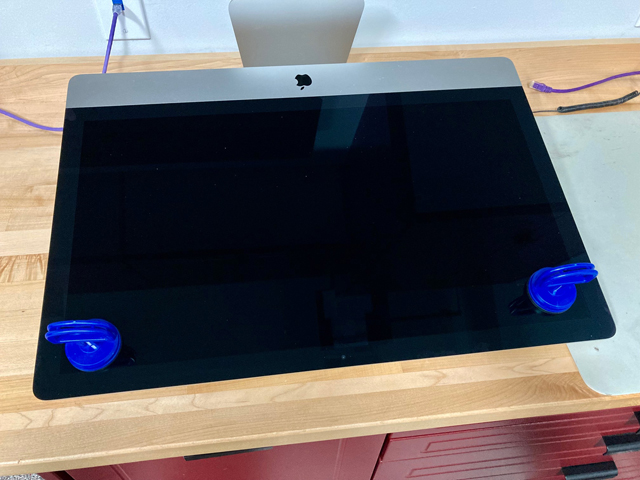
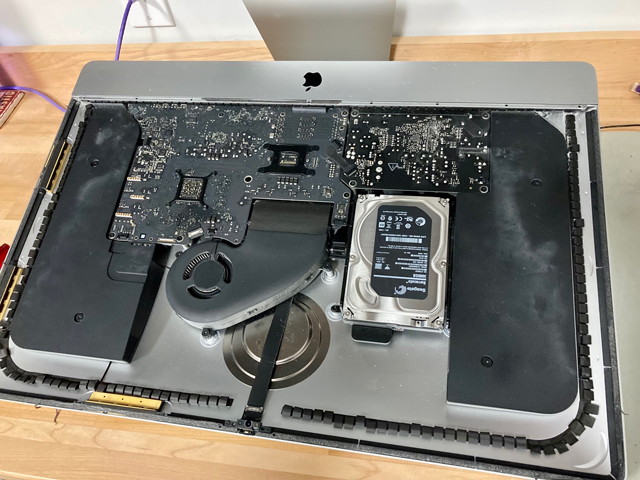
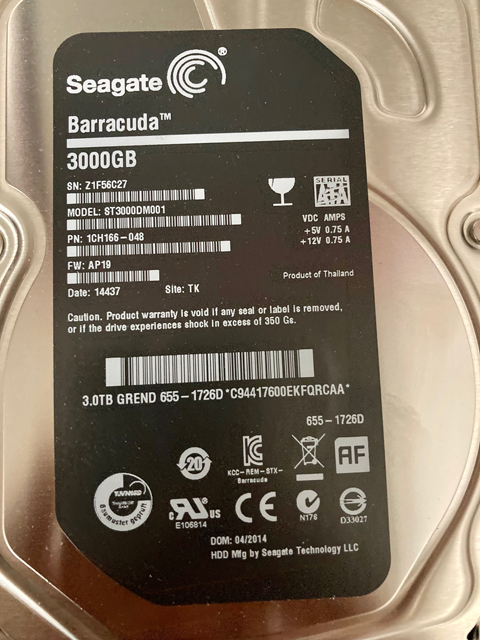
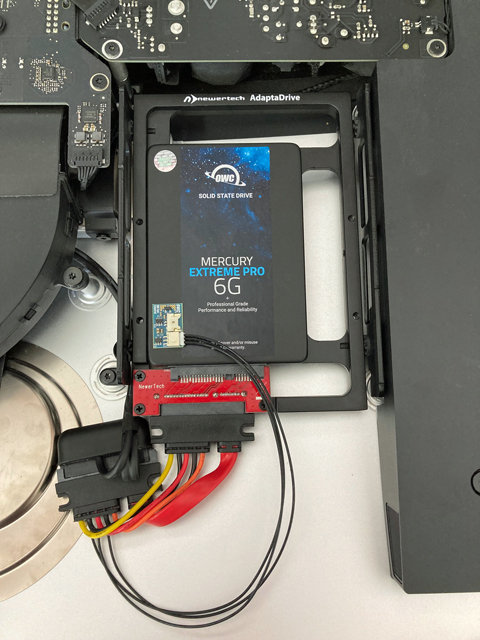
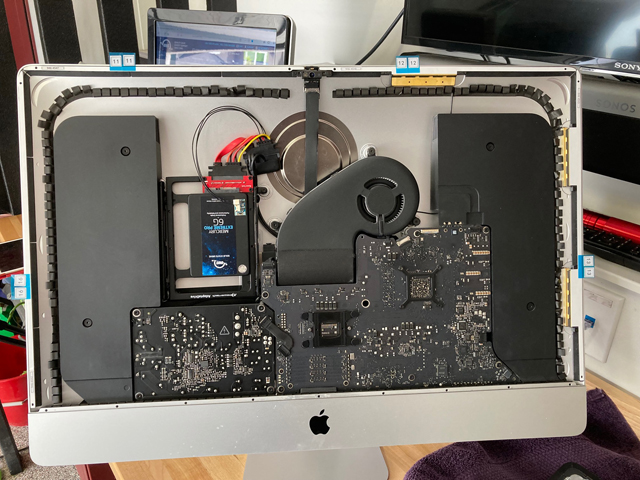
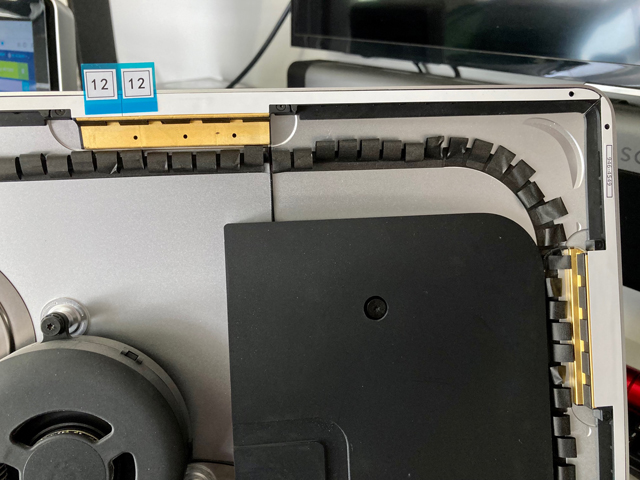
| So my beloved iMac that I use in my office recently died a slow agonizing death. It started when I sat down one morning to see an error message that it had recovered from a failure waking up from sleep mode. From there onwards it was a slow downward spiral. The OS just completely ground to a halt. It would take 15 minutes to even switch between windows. In trying to figure out what the problem was I tried various things: Reset the System Management Controller (SMC), ran a disk check in Disk Utility, ran the hardware diagnostics on booting, ran Activity Monitor to rule out Malware chewing up CPU/Memory and so on. Granted my system is considered 'vintage' in that it's a late-2013 model, but up until that crash it ran perfectly fine. I also did not want to simply replace it with a new iMac as the one I had was absolutely maxed out when released - a special build-to-order only configuration. Its equivalent new replacement would have cost me over $7000. So I was really left with only one option - replace the Fusion hard drive that came with it with a SSD drive and upgrade the OS at the same time from High Sierra to Catalina. Fortunately I knew that I could get a replacement drive and kit from OWC. After about a week it showed up and I got to work. On their website they have an invaluable video on the procedure to do the swap. Besides the drive, it also came with the equipment needed to disassemble your Mac, including a pair of suction cups. Up until this point I had only ever worked on upgrading the older plastic White cased iMacs which is a rather complicated affair, but getting to the internals a fairly easy process. On these newer aluminum Macs the display is held in place with adhesive, and much like with replacing a car windshield, you need the suction cups to remove it. First however, you need to use a special tool to run just behind the display and cut the adhesive holding it into place. Once that is done you gently pry off the display and remove the two cables connecting it to the motherboard. This was tiresome as the one cable you have to gently pry off which is awkward while also holding up the screen. Eventually I got them both off and removed the display. Then it was a matter of loosening two screws on the right speaker to move it out of the way in order to access the hard drive and remove it. You then remove the bracket, the side screws of the hard drive, put them in the replacement bracket which also mounts the SSD drive, affix the temperature monitor to the drive, put the entire bracket and drive back in the Mac and put the speaker back in place. From there you need to remove all the old adhesive tape and then replace it with the new adhesive tape that came with the kit. An included diagram shows you which strip goes where as they are also numbered. Then you put the bottom of the display in place, making sure it's flush to the chassis, and again awkwardly hold the screen while you reattach the two cables and then lower it in place and press all around the edges to seal it. Last step is to use the included microfiber cloth to remove any fingerprints and suction cup marks. I then plugged everything back in and hit the power button and held my breath.
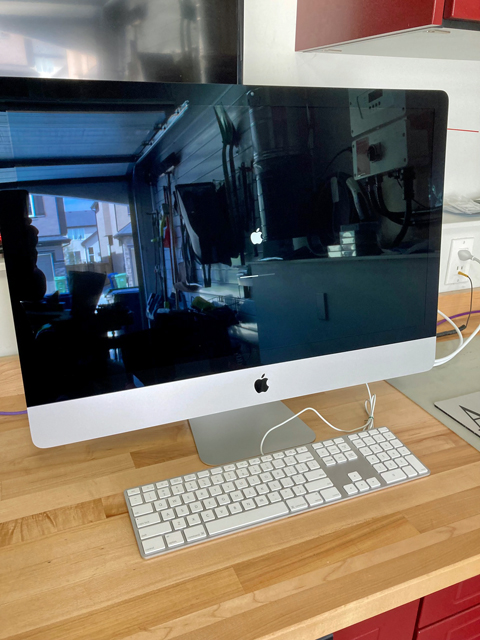
Thankfully I got the old familiar boot chime and booted off the USB key which held an installable copy of OS X Catalina. I went into Disk Utility and formatted the new SSD drive. However in a bit of a head scratcher moment it gave me a bunch of formatting options - as the newer versions of OS X now come with APFS (Apple's new file system) I had planned on selecting it. But the drop down also gave you the option of APFS - Encrypted, APFS - Case Sensitive, and APFS - Encrypted and Case Sensitive. So I did some quick Googling and the consensus was to skip the case sensitive options and I didn't care about encrypting the drive, so I just picked 'ADFS'. But then you also had to choose the partition options which included Apple Partition Map, GUID Partition Map, and Master Boot Record. I knew MBR was an ancient DOS era type option so wasn't going to pick it, but wasn't sure which of the other two options to pick. Then answer after some more Googling is to pick GUID Partition Map - Apple Partition Map is for ancient (pre-Intel) Macs. After the drive was formatted, I rebooted back into the OS X Catalina installer off the USB key and selected the SSD drive to install the OS onto. Once the installation was done I was able to create an account and login. But most importantly, everything was snappy and responsive again! The final step was to use the Migration Assistant to copy all the data back off of my external backup drive which held all my Time Machine backups. I want to emphasize how important using Time Machine and an external drive is. Without it, I would have lost everything. Ultimately I still don't know what the culprit was, but the combination of a new drive and OS did the trick. As a bonus, the SSD drive is even faster and even larger than before. Plus with Catalina installed I should be able to get a few more years of use out of my pride and joy before Apple stops supporting the OS. |

| Edge Subscription - Apr 29, 2021 | ||
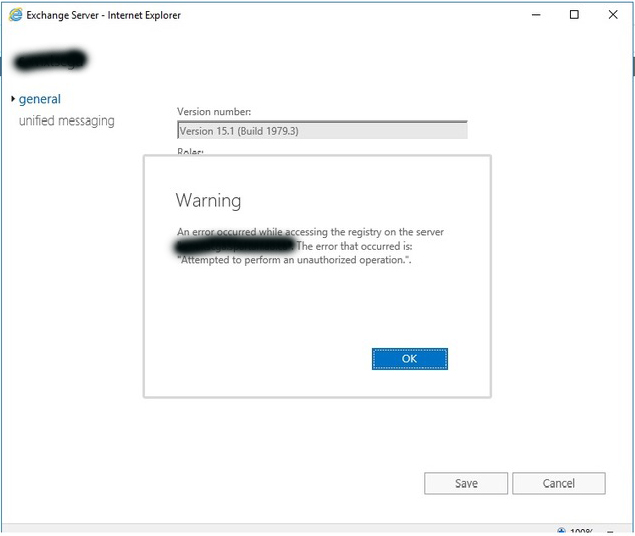
| When we migrated from Exchange Server 2013 to 2016, as part of the redesign we implemented an Edge Transport server. It sits in the DMZ (Perimeter) Network and acts as a relay to receive and send emails from the mailbox servers sitting in the Production network. This is typically done to add an extra layer of security as you then aren't opening up ports on your firewall directly into your corporate back-end network. Recently, as part of the contingency steps to protect against the serious Exchange security flaws that were discovered this past March we upgrade all our Exchange servers to Cumulative Update 20 (CU20) - which contained the prerequisite security fixes. Afterwards I noticed in the Exchange Admin Console (EAC) when looking at the server versions, all the Exchange servers showed the correct version (15.1 Build 2242.4) except for the Edge Transport server which still showed the original version it was setup with. In addition, when you double clicked on the Edge server to see it's properties in the console it threw up the error below.
So off to Google I went trying to see what was going on. Eventually I came across a useful article that pointed out that after any upgrade to the Edge server you need to resubscribe it. As it sits in the DMZ this is the only way you're able to update its info in the console on your internal servers. This is a procedure that involves running the following command on the Edge server: New-EdgeSubscription -FileName "c:\<filename>.xml" Then copying that xml file to one of the mailbox servers (I'd suggest always using the same server for this) and running this command to resubscribe: New-EdgeSubscription -FileData ([byte[]]$(Get-Content -Path "c:\<filename>.xml" -Encoding Byte -ReadCount 0)) -Site "<AD Site>" Where obviously filename is the filename you want to use and AD Site is the site the servers are in. Once that is done you can run this command on the mailbox server to test that synchronization is still working properly: Test-EdgeSynchronization It should give a SyncStatus of Normal. All that said, I was reluctant to just go ahead and do it as when we did the initial subscription, we noticed the license for the Edge server reverted back to Trial. After a bunch of messing about we eventually got the proper license to stick. So I arranged for Microsoft to be available in case that happened again. Thankfully it worked fine this time. I suspect the issue originally was that we forgot to apply the license before doing the subscription - so the take away is to make sure you apply the license to the Edge server first. Afterwards I tested the synchronization which was good, did a refresh in the EAC, and this time it properly updated the version to match all the other servers. |
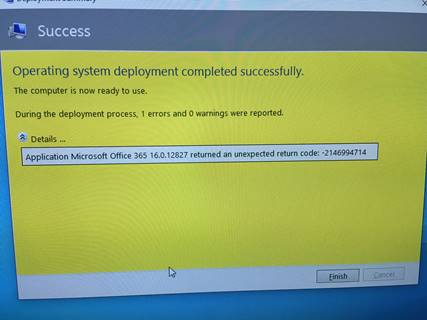
| Microsoft Oddities - Nov 3, 2020 | ||
| A couple of Microsoft bugs have reared their ugly heads lately. In the first instance, we recently updated Office 365 to a newer build, and the config file was created using an updated version of the Office customization tool. It tested fine using the traditional install methods (Start, Run, <path>\setup etc.). But we noticed when deploying on newly imaged systems using Microsoft Deployment Toolkit (MDT) that it would fail with the generic error below. With a bunch of other projects going on I didn't have the time to troubleshoot properly so I put in a support call with Microsoft. That was a bit of a gong show. I've had this support issue with MDT in the past - when creating the support request you are supposed to pick the product affected. But there's no option for MDT. The closest product to it is Systems Center Configuration Manager (SCCM) which is what I chose. It took forever for someone at MS to contact me - I'm guessing the ongoing pandemic is disrupting operations in India - and when I finally was able to talk to someone they of course informed me I had the wrong product group. So I had to wait even longer for the right person to contact me. In total, it took a couple weeks to get to the right person.
By that time I was pretty frustrated so I decided to try and figure it out on my own. I added additional logging to the installation process for O365 and looking at the logs was able to find the problem. For whatever reason, and again only when deploying via MDT, it was adding extra '\'s to the source path. When you run the customization path you specify the source location for the install files, this is then stored in the xml file that gets created. And I verified the xml file was correct. But when you look at the install log it shows that it's trying to install from: \\\\<server>\\folder\\subfolder So while Microsoft took that info and investigated after doing a bunch of searching, I came across an article with a workaround. Basically you strip out the source path from the xml file, use a .cmd wrapper to call setup in conjunction with the %~dp0 variable which embeds the path the program is running from. I made those changes and now O365 installed fine. This is also a better way of doing it if you have remote sites as it ensures that O365 is installed locally and not from across the WAN. Microsoft knows what the issue is, hopefully they fix it in a future update. In the other bug instance, one of my coworkers wanted to increase the default TTL timeout for servers from 20 minutes to 1 day. To do so he created the static entry in DNS for the server and unchecked the 'Register this connection's addresses in DNS' setting in the TCP/IP properties for the network adapter. With that setting checked, the next time the server rebooted, the DNS service restarted, or I believe after 24hrs it would set the default TTL back to 20 minutes. Everything seemed ok at first until the servers did their monthly reboot to apply MS updates. Then we started getting calls from users that they couldn't access certain servers. Turns out there's a bug in Windows 2008R2/2012/2012 R2 that when that setting is unchecked it will remove the static entry from DNS. Sure enough, the affected servers were all running that version of OS. There's an article that mentions the bug and that it was supposedly fixed, but that article is several years old. So either the bug was reintroduced, or the fix never worked properly. So after more research and more testing we found a group policy setting that would allow you to set the default TTL and leave the TCP/IP default setting enabled. That way we got our 1hr TTL and had the safety net of leaving the default TCP/IP setting enabled - and ensuring we wouldn't be bitten by this bug again. The group policy setting is: Computer Configuration\Policies\Administrative Templates\Network\DNS Client\TTL set in the A and PTR records Two bugs discovered in the span of a couple weeks. |
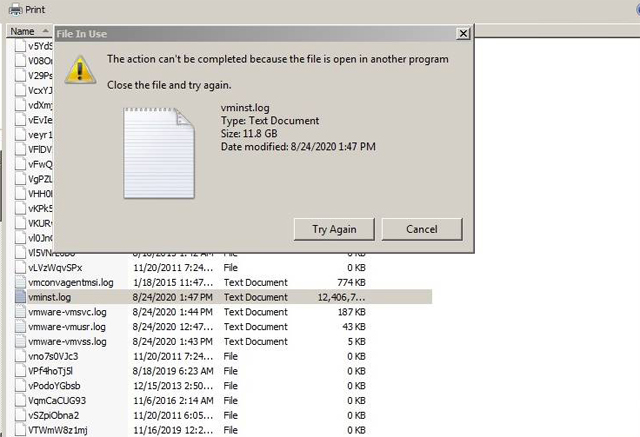
| Mystery Log File - Sep 1, 2020 | ||||
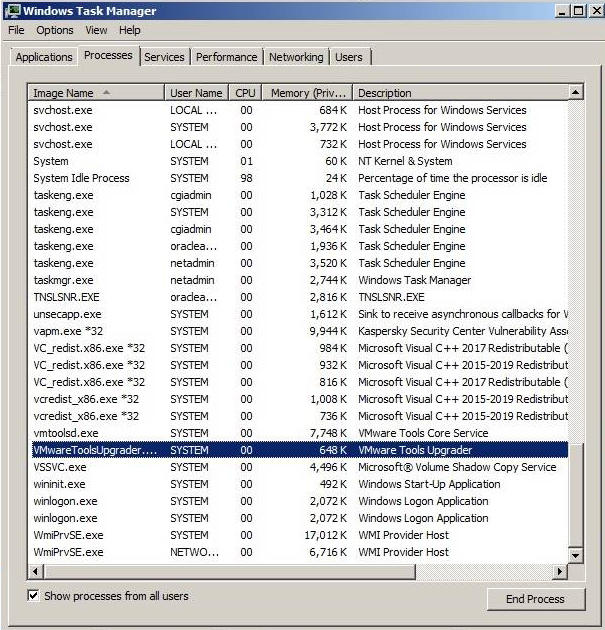
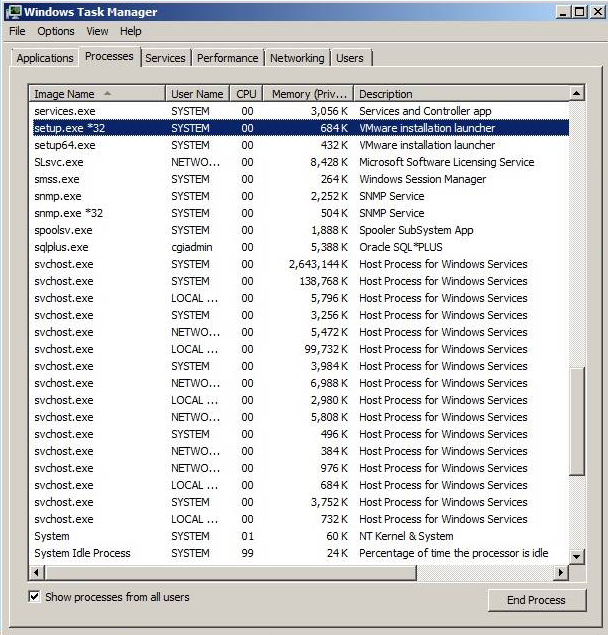
| One of our older VM's running Windows 2008 - yes, sadly, some are still running on such older operating systems - recently ran out of space on it's C drive. After remoting in and poking around I found that there was a VMWare log file - vminst.log - that was taking up a shockingly large amount of disk space. After some research I found that this file is the log file that is written to when installing/upgrading VMWare Tools. Ok, so not critical, I should be able to just delete it right? Nope. Whenever I'd try it wouldn't let me, complaining that the file was still in use. So I did some more digging and came across some articles on VMWare's support site which offered several suggestions on how to get rid of this file. Unfortunately none of the 'official' suggestions worked. I tried rebooting, tried turning of the VMWare Tools service etc. But I still couldn't delete it. Finally I came across a thread on Reddit which offered the solution. On that thread they said the issue was it was a hung install of VMWare Tools. But the weird thing was when I went and looked at the VM in vSphere it didn't show the Tools being mounted at all. So I'm not sure what happened. Obviously at some point in the past there was an attempt made to upgrade and it didn't work and got left in a hung state.
According to the thread the fix was to look for several upgrade processes and kill them - namely the VMWareToolsUpgrader process and a couple VMWare Tools setup processes (both 32-bit and 64-bit). Once I killed them I then had to stop the VMWare Tools service. It was only after doing all those steps that I was finally able to delete the log file and free up the disk space. I did note that like with this VM, the original poster also encountered this on a VM running Windows 2008. So perhaps these older versions are more susceptible to having a hung install. In any case, the C drive is now no longer out of space. |

| Wireless Router Upgrade - May 7, 2020 | ||
| A long time ago, Apple's slogan was 'It Just Works'. And for a long time the slogan was appropriate as using a Mac was just an all around less frustrating experience than using an equivalent Windows based PC. Fast forward several years however and that slogan began to be something of a cruel joke as that ease of use and ability to simplify the user experience was lost as they started to lose the battle for market share. Yet occasionally, you're still able to have a shockingly good experience with Apple products. Such is the case recently when I upgraded my 5th generation Apple Wireless router to their 6th generation model. At the time I was happy enough with the one I had. It was simple to operate, performance was good, and I liked the Airport utility interface. Sadly Apple announced one day they were getting out of the wireless router business so I decided to snap up what would be the last version they were selling before they became unavailable or were sold for large mark ups. After a few weeks it showed up and then sat in my closet for I don't even know, several years. Until now. With life under quarantine I decided there was no time like the present to finally getting around to upgrading. That said, I wasn't looking forward to the process. Over the years I had built up a long list of custom firewall rules and settings and a long list of approved MAC addresses for my wireless network. I just assumed it would be a pain to transfer all those settings over and so I went about creating screenshots of each and every dialog and wrote down all the MAC addresses etc.
So I was pleasantly surprised when I read online that it was actually a pretty simple process. That process is this:
And well, that's basically it. I will say I ran into an issue while trying to do it from my iPad, half way through the transfer process it locked up. But I then tried it from my iMac and this time had no problems and it completed quickly. After the transfer was done it recognized there was an available firmware update, so I updated that - and then I was done. Everything was up and running on the new device. I went into Airport utility and verified that everything had been migrated over properly. So what's better about the 6th gen? Mainly it supports the newer standard 802.11ac and offers roughly double the throughput. About the only downside is it's physically much larger. Same footprint, but quite a bit taller. Thankfully there are a number of 3rd parties selling mounting brackets - one of which I bought and used to mount it on my basement wall by the equipment rack. In summary, yes, sometimes Apple still does 'just work'. |

| Phantom Domain Controller - Mar 30, 2020 | ||
| A couple weeks ago I installed a new Windows 2016 based Domain Controller (DC) in our environment and demoted the old 2012 R2 based DC. Everything appeared to work fine, all the dialog screens indicated things were successful, going into Active Directory Users & Computers showed the old DC no longer in the Domain Controllers OU etc. However about a week after that we had a user complaining they couldn't run the login script and when they checked their environment variables %LOGONSERVER% was showing the old DC trying to log them in. Obviously something wasn't right. Off to Google I went and looked at numerous articles. At least we weren't the only ones who've experienced this issue before. But all the suggested places to look, ADSIEDIT, DNS etc. didn't show the culprit. I did notice that in Active Directory Sites and Services the old system was showing under the local site folder, but unlike the other DC entries, it was missing the NTDS subfolder. In any event I deleted it, but after waiting awhile for replication to occur the user was still having the problem. I also ran Repadmin and checked the replication topology and confirmed the old system wasn't showing. Eventually I came across a post that in the troubleshooting steps said to open a Command Prompt and run: nslookup <domain> So I did that and sure enough the ip address of the old DC was listed amoungst the other DC's. Now I at least had something to go on. After switching gears and searching for related threads I finally found the answer in an article which suggested looking in DNS, but specifically the (same as parent folder) entry.
“In DNS console, go to the forward lookup zone for your domain. What you want to delete is the A record for "same as parent folder" that points to the IP of the machine that used to be a DC”. Once again, there was the ip address of the demoted domain controller showing. I deleted it out of DNS and went back to the Command Prompt and re-ran the nslookup command and this time the entry was gone! Called the user to try again and they were now able to logon, with the newly setup DC doing the authentication. From now on I'll be checking this when doing any future demotions. |

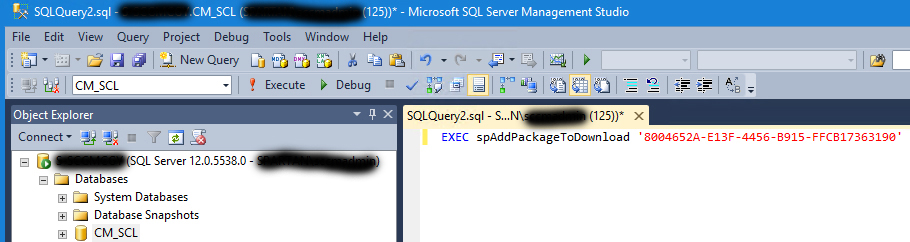
| Busted SCCM Update - Mar 4, 2020 | ||||||
| We're currently running Build 1906 of SCCM, having recently upgraded to it. So far the new version has been working fine and everything has been solid and working well. However, today I was in the SCCM console and I looked in the Updates section and saw that there was a hotfix for it available for download. Going through the release notes showed nothing out of the ordinary, and just a handful of fixes so it should have been a quick and easy install. In the past, anytime I've gone through this process there were never any issues. This time however was different as no matter how many times I’d click on the download button to get the hotfix, it’d pop up an error dialog. I did some Googling and apparently this is a ‘bug’ in version 1906.
Someone else had to put in a support call to Microsoft to get the solution. Which is this: In the Updates and Servicing section, right click on the columns and select ‘Package Guid’. Resize the columns so you can see the associated GUID with the 1906 hotfix package. It should be: 8004652A-E13F-4456-B915-FFCB17363190. Open up SQL Management studio, click on the SCCM site database, and Execute the following query:
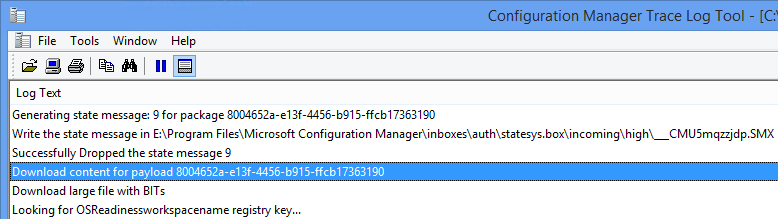
Then restart the SMS_EXEC service. Wait approximately 15 minutes, and do a Refresh in the SCCM console for Updates and Servicing and you should see the State change for the hotfix from ‘Available to download’ to ‘Ready to install’. Now you’re good to go. You can also verify the download status by opening the dmpdownloader.log:
Happy updating! |
| Portrait Mode - Nov 16, 2019 | ||||
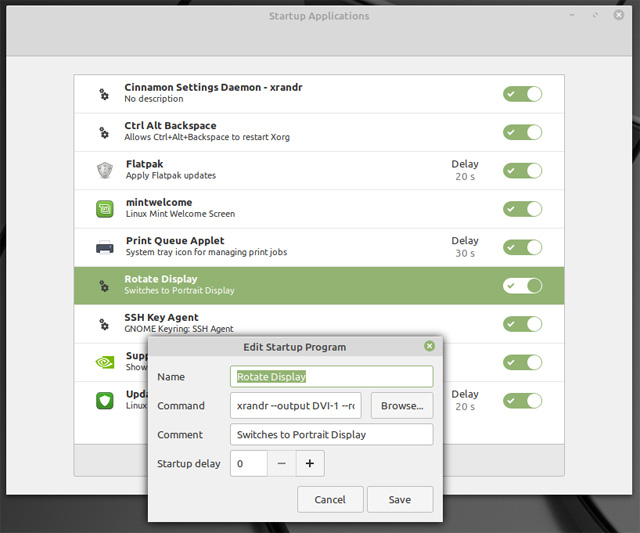
| Recently I broke out my Linux Mint PC and upgraded it to the latest version - 19.2. Normally I just muck around with my Linux box for a few days and then set it aside. But now my intention is to one day use it as a validation node for the Ethereum network. Assuming there'll be a Linux client and assuming they ever make the switch from Proof of Work (POW) to Proof of Stake (POS). As such, I figured I should end up using it on a daily basis and get more familiar with Mint. So I set it up in what will be it's permanent place and hooked up the mouse, keyboard, and monitor. My monitor is an ancient HP model that you can rotate so that it operates in Portrait mode. I've never operated it that way before, but now I'm more concerned about conserving desk space, so it'd be ideal if I could get it to work in that mode. I remember way back in the day when Radius came out with their Pivot monitor for the Macintosh and being blown away that the monitor could auto sense it's orientation and change the resolution appropriately. Fast forward to today, and unfortuneatly the default video driver I'm using in Mint doesn't do the same. Off to Google I went and after some searching came across the 'xrandr' command you can run in a terminal shell and manually rotate the display. First you need to run the query option to get the internal name of your monitor connection - in my case DVI-1. Then it's simply a matter of telling it to rotate:
Ok great, I can now manually rotate the display but that would quickly get old having to do it everytime I logged on. Fortunately, you can go to the list of Startup Applications and create a new entry with the rotate command:
After doing that I rebooted the system and once it came back up I logged in...and the graphic shell Cinnamon promptly crashed. After some head scratching I decided to add a 5s delay for the command and after rebooting and logging in there's no more crashing and the display automatically rotates to Portrait mode! The only downside I've encountered with this approach is the command doesn't run until after you log on, meaning the login screen is still the wrong orientation. I imagine there's a way around that as well, but for now I'm happy with the result. |

| OpenManage Issues - Aug 31, 2019 | ||
| With the introduction of some new servers I've started installing them using a newer version of Dell's Server Administrator (OMSA). Specifically, I've been installing version 9.3 which is the latest offering of the product which acts as a standalone application to monitor the hardware health of the server but also can be setup to relay information back to Dell's OpenManage Essentials software which you can use as an Enterprise monitoring tool - it allows you to keep an eye on the health of all your servers. One of the nice features is you can regularly download an updated database of all the latest drivers and firmware versions and you can then check and run reports to see which systems are out of date. You can either go and download the updates individually and apply them directly on the server, or the program itself will connect to the server and install them for you. However I noticed that the newer systems weren't showing up in the inventory for systems needing updates. When I dug further I found they were all contained in a collection of systems that hadn't been inventoried yet. Which was odd as the software is set to routinely go out and inventory the various servers it has discovered and been set to manage. Looking at the logs I found this error: Inventory collector is not installed on this server. In Band updates cannot be applied. Weird, as I've never had to install a seperate piece of software before in order for inventory to work properly...
Off to Google I went and eventually came across this thread. For some reason Dell, in it's infinite wisdom, decided to turn off inventory collection by default in Server Administrator in the newer versions. To get it working you need to break out the command prompt, navigate to the directory OMSA is installed in and enter the command above. After doing that OpenManage Essentials was able to properly inventory these newer servers and present a list of which drivers and firmware versions needed updating. Note, the article mentions it being turned off by default on OMSA 9.1, but I never encountered this being an issue until we upgraded to 9.3. Your mileage may vary. Happy inventorying! |

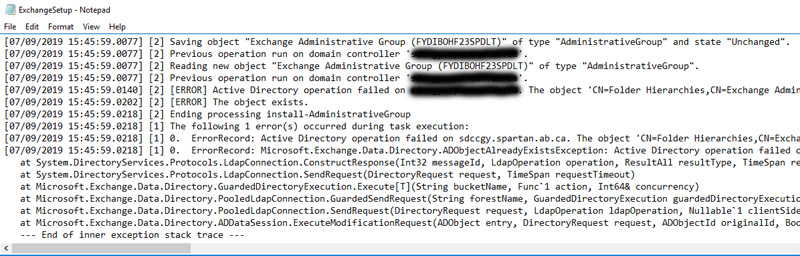
| Exchange 2016 Setup Failure - Jul 16, 2019 | ||
| Went to install our first Exchange 2016 server and as always seems to happen ran into problems right away. Our current environment is Exchange 2013, having previously upgraded from 2010. Everything I read in the migration guides seemed to indicate the upgrade was a fairly straight forward process as outside of all the roles now being consolidated on one server there didn't seem to be a lot of major changes between 2013 and 2016. So I got the install media, got my install key, fired up setup and watched in keen anticipation that we'd soon be running the new version. However during the phase where it updates the Active Directory schema it crashed and burned. As usual the error message was somewhat cryptic. Thankfully punching it into Google returned an actually useful article for a change that explained what the issue was. Although the article is written for 2013, in our case it worked for 2016 as well.
I was somewhat sceptical but I went ahead and fired up ADSIEDIT went to the suggested object and added the suggested value. Upon re-running Exchange Setup it carried on past the point it previously failed at and after a few minutes the install was completed. The article mentions the issue is due to the Public Folder tree object being manually removed previously. Which makes sense as I recall having to do just that when we uninstalled the last Exchange 2010 server. No matter what I tried I could not finish the removal as it wouldn't let me delete the Public Folder database on that server. Eventually I had no choice but to use ADSIEDIT to rip it out. So now we have the first server installed and can continue on with our migration project. |
| iMac Upgrade - Jun 28, 2019 | ||
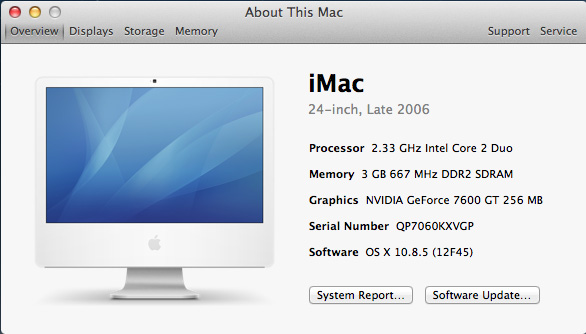
| In the past I've detailed the upgrades I've made to my beloved iMac circa 2006. It was the last Mac with a matte screen, had a fun plastic enclosure, ran the ever reliable Core 2 Duo chipset, and even came with a little remote that magnetically attached to the side you could use with to play music, watch videos etc. To get the most out of it I had previously upgraded the memory to the maximum of 4GB (only 3GB recognized sadly) and swapped out the hard drive with a SSD drive. Finally I upgraded the Operating System to OS X Lion which was the last supported OS for that model. I also had the very rare 7600GT video card with max ram. So as far as I thought it was as upgraded as you could get. Then one day I was randomly searching the Internet and I stumbled across a post saying that although officially unsupported it was possible to install OS X Mountain Lion (ML), the succesor to Lion on it. What?!?!? So I did some more research, came across a mega thread on Macrumors and it seemed like this was actually legitimate. Then I did some more digging and found out the general consensus was that ML was worth it. It was essentially a release that focused on improving things rather than churning out new features. It fixed most of the major issues with the previous release and gave an all around performance boost. Ok, so I was convinced, now where to start? First off, the downside to going through articles from over a decade ago is that in many cases the links are broken, the information out of date or just plain wrong. As such, it took me awhile to find the correct info and the correct software to accomplish this. Here then, are the steps I took:
Ok, but why does it still say 10.8.4 when you go into About This Mac? To fix that you need to edit a file. Open your hard drive and go into System, Library, Core Services. Create a backup copy of SystemVersion.plist and then edit it. Replace the contents with this: <?xml version="1.0" encoding="UTF-8"?> Now when you go into About This Mac it will show as being 10.8.5. Besides properly reflecting the correct version, you are now able to run Software Update and get all the proper updates and patches for that version. That said, while I was able to install most of the available patches - do not install the 'Security Update 2015-006' as it will break things and you won't be able to boot again.
After patches were applied I updated iTunes to the latest supported version - 12.4.3.1, went to the App store and downloaded software I had previously installed - ie. Numbers - but it now offered the upgraded versions that supported the newer OS. So the last thing to do was to pick a browser. With Lion I was getting warnings more and more about my browser being outdated. I had long since stopped using Safari and was instead using the Extended Support Release (ER) release of Firefox which was the last supported version for Lion. I had read it was possible with some tweaking to run newer versions of Firefox on ML, but eventually I came across a bunch of posts recommending Waterfox which was a spin-off version of Firefox. It uses the engine from before the major Quantum upgrade, but it still comes with regular security patches - for all intensive purposes it's a modern supported browser running on your ancient iMac. So far the only issues I've come across is in System Report, Bluetooth returns an error when you click on it - although my Bluetooth mouse works fine - and it looks like Apple detects unsupported configs when you run Messages and won't let you log in. Which is disappointing as I was looking forward to using it. But overall I'm extremely pleased with this upgrade, it definately feels much snappier, and I'm happy that I'm now on a modern browser. It's amazing to think I can still happily use this machine which is now almost 15 years old! |
| New Website! - Apr 22, 2019 |
 Finally! As you can see the new website is up and running. It's not so much new as new and improved I guess. As mentioned previously, originally I had wanted the refresh ready in time for the 15th anniversary of this site. I had started working on a new design and was a few weeks into it when the hard drive crashed and I lost everything (yes I know, backups). So that was somewhat disheartening and then life got in the way combined with general laziness and it didn't happen. When I finally got around to giving it a second try I quickly felt overwhelmed. It had been so long since I really even considered what website authoring platforms were out there that I felt somewhat like a Luddite. This site was obviously long in the tooth having been authored with Frontpage 2003. Wordpress is the current darling of bloggers everywhere but I don't like Wordpress sites. I don't care how many different themes and templates they offer, to me they all look the same. I had worked hard on my site and wanted to retain it's unique look. I also enjoy knowing the nitty gritty details of how everything works - for me just drag and dropping pictures and typing some content wouldn't be fullfilling. So in the end I went with Microsoft Expressions which while still dated, is about a decade newer than what I was using. It also has the benefit of being free. But even with a new platform I wasn't sure how to tackle my biggest issue of how to make the site mobile friendly. In the end I found a local web design company and paid them to do the heavy lifting. I was confident they'd be able to supply the necessary coding that I would be able to integrate without having to do a complete rewrite. Turns out I was right. So now things look good on any platform - whether computer, tablet, or phone. If you're using a phone it defaults to a new mobile menu and if you're using a computer and resize it to a small size it will auto switch as well. In addition to the mobile focus I also updated to version 2 of Slimbox which is the code used when looking at sets of pictures. I also put in a search button which uses Google search. Currently it's add supported, but if I wanted to I could pay them a yearly fee and it would strip that away. The only downside is that most results will show from prior to the update so will look out of place, but over time as more content is published post-upgrade it will all look consistent. I struggled with how far back to go with the new format - redoing the entire site was not going to happen due to the amount of effort involved. In the end I decided just to go back to last year. I might eventually go back five years, but we'll see. I also put in a quote generator at the bottom. Instead of just randomly showing different quotes each time a page is visited it will only show a new quote once per day (per browser). This was a blatant rip off of the one they have on Slashdot which I've always gotten a kick out of. Finally I have obtained a 3rd party certificate and plan to make this site secure at some point in the near future. Personally I think the whole insistence on encrypted sites to be a money making scam by the search engine companies. Unless you're doing banking or inputting other personal information into entry fields websites do NOT need to be encrypted. But to the average user at home they just see the warning at the top of their browser and think something's wrong. So at some point I'll give in and submit to the inevitable. So there you have it, it's a new era for Jamesplee.com! |
| Broken WDS - Apr 9, 2019 | ||
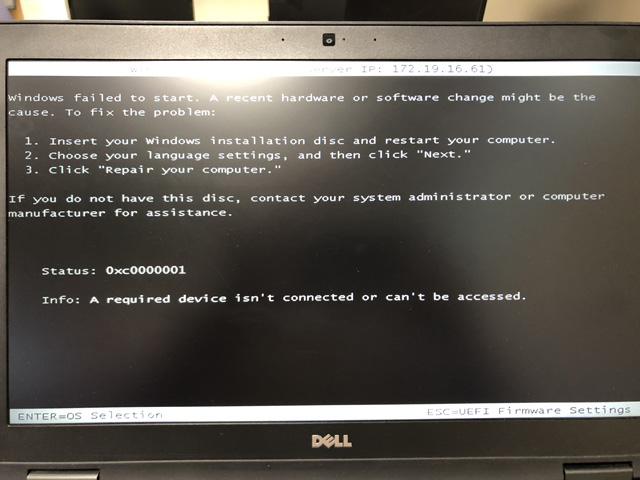
| Got a phone call recently from our Help Desk asking if Imaging was down. Out Imaging consisting of Microsoft Deployment Toolkit (MDT) tied into Windows Deployment Services (WDS). Once images are captured and stored on our deployment servers, technicians will PXE boot the client system which brings up the Litetouch menu. They pick a few selections, hit Next and off it goes installing the image. However this time it wasn't working at one of our locations. It would start downloading the Litetouch boot image...hang for a bit during that process...and then puke up the error below. So I tried a bunch of things to try and resolve things. Had my counterpart try various different models to rule out it being a driver issue. Had them try different network ports to rule out it being a bad cable, port, switch etc. Restarted the WDS service on the deployment server and when that didn't work did the old standby trick of rebooting the entire system. Nothing worked. I did a bunch of Googling but wasn't getting anywhere.
Finally I stumbled across this post and a light bulb went off - as the only recent changes done were applying the latest bunch of Windows Updates. So as per the article I went into WDS, clicked on the TFTP tab, unchecked the 'Enable Variable Windows Extension' option, and rebooted the server. Sure enough that fixed the problem. About the only negative that's obvious from doing this is that the Litetouch boot image loads a little bit slower now. As the March updates broke things, I'm curious if the just released April updates have patched the patch. Slow clap for Microsoft quality control! |
| Black Screen of Death - Mar 29, 2019 | ||
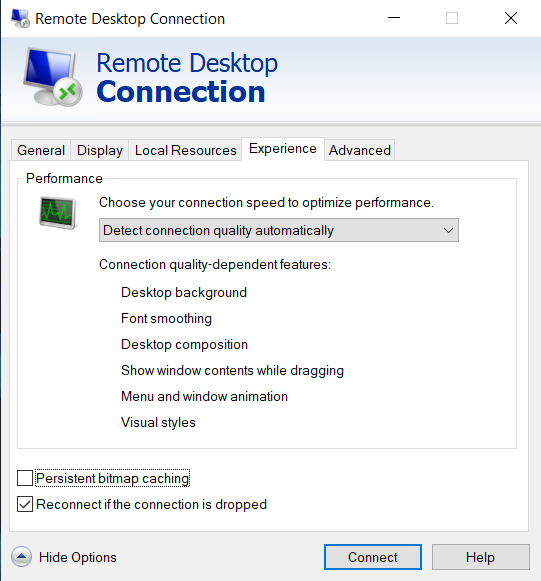
| A colleague asked me why whenever he connected to any of our servers using Remote Desktop Connection (RDP) it would sit at a black screen for minutes before eventually continuing on with the login process. I had noticed this phenomena as well but hadn't yet gotten around to investigating it. It did seem like it was happening more and more often and when you connect to servers multiple times a day the time wasted does add up. There didn't seem to be any pattern, it would do it on some, but not all. It would do it on servers running 2012 R2 as well as older ones running 2008 R2. Would also do it on both physical and virtual systems. So off to Google I went (what did we do before the Internet) and tried to find a solution. Turns out we weren't alone in encountering this annoying issue. It has even been coined 'The Black Screen of Death', a humous riff on the infamous Windows' Blue Screen of Death. The recommended solution, shown below, was to go into RDP properties on your client and turn off 'Persistent bitmap caching'.
Sure enough, that has seemed to have done the trick. We can now reliably connect using RDP and now are no longer left staring at a black screen. Doing some more digging it appears to be an issue with when your client has a different resolution than the target system you're trying to connect to. Some other suggestions involve simply running Task Manager which seems to get things rolling, or restarting the RDP service and trying again. But as mentioned, simply turning off Bitmap Caching works for us. |
| Why Won't You Install? - Feb 26, 2019 |
| Recently I pulled a server out of service which was functioning as a VMWare ESXi host. The model was a Dell PowerEdge R720 and the plan is to repurpose it to be come a new Exchange 2016 server. The first step was to upgrade the firmware on the NICs and on the iDrac, and install the latest Bios - which was done without any issue. The next step was the install of Windows 2016. That is where all the fun began. To date, any OS reinstall I had done was on older server models using the Dell deployment DVD. You'd boot of the DVD and when it told you to do so, swap in the Microsoft OS disc and off it'd go and install everything. With 12th generation and up servers however, I knew you were supposed to install via the Lifecycle Management interface. So I popped into there, picked Deploy OS, clicked on the edition drop down...and 2016 wasn't an option. Did some digging online, and apparently 12th gen Dell servers don't support installing 2016 with that interface. Ok, a bit of a pain, but I figured I'd simply install 2012 R2 instead and then upgrade to 2016 from there. So again, back into the controller interface, picked 2012 R2, had my OS disc in the DVD drive...but the option was greyed out. What was going on? Did some more digging online and found that you can apparently only install Windows through that interface if it's the retail version and not a volume license disc which is what we use. Some grumbling then ensued and back to the web to do some more searching. At that point I turned up several posts from people saying just to directly boot from the OS media and install it that way. Ok, well I happened to already have Win 2016 on a USB key that I'd previously used to test 2016 and knew was good. So I rebooted, picked the UEFI boot menu...and it didn't recognize the USB key. Did some more searching and found out that the file system - FAT32 - that it was formatted with only supports file sizes with a maximum of 4GB. Unfortuneatly the install.wim file was larger than that. For some reason if I booted into Legacy mode (non-UEFI) it would see the drive and I could install 2016 but then my system partition would be formatted with the older MBR format and not the newer GPT format. At this point I was really starting to get annoyed. I came across some posts which used 3rd party tools as a solution, or other posts which mentioned booting with Windows 10's media and using the MBR2GPT command to convert the partition, but first you had to go and do some resizing and expanding of the support partitions. Eventually I came across a post which for me was the simplest an easiest solution. First step was to use the DISM command to split the install.wim file into two smaller files: dism /Split-Image /ImageFile:sources/install.wim /SWMFile:sources/install.swm /FileSize:4000 Then I deleted the old install.wim file, copied all the 2016 files off the USB stick into a temp directory and reformated the USB key using the DISKPART command: list disk select disk 3 clean convert gpt create partition primary format fs=fat32 quick assign Obviously 'disk 3' being the USB key Then I copied everything back to the key, rebooted, double checked I was still booting into UEFI, and now it saw the USB key as a bootable option. I picked it and was able to proceed with installing Windows 2016. Much rejoicing then ensued. |
| Can't Resize Datastore - Jan 13, 2019 | ||
| Our version of vCenter is currently 6.0. In the past I've had to occasionally increase the size of the Datastores and would increase the size on the SAN and then simply go to the configuration tab on one of the hosts, select the properties for the Datastore, click on the Increase button, it would see the additional space available expand it, then do a rescan and the larger size would now be recognized. But for some reason, after having upgraded vCenter to 6.0 and going through the exact same procedure I had done in the past, it wouldn't recognize the additional space. When you went to increase it there was no storage listed in the Extent Device dialog. Just to be sure I went online and looked up the procedure from VMWare's documentation and confirmed I was doing everything correctly - it just would not show the storage. So what was going on? As usual I did a bunch of Googling and came across a post on Reddit of someone complaining of having the same issue. Somewhere in the thread someone mentioned to use the fat client and connect directly to one of the hosts. They also referenced a VMWare support article.
Note that the article says that the inability to expand Datastores is a safety feature to prevent possible corruption. Ok great, but I still need to expand the space. The article doesn't mention how you go about doing that in consideration of these new safety filters that are in place. So as always, when in doubt, contact VMWare support before attempting this! In my case I went ahead and connected the vSphere client to one of the hosts directly, went into the datastore properties, and now when I hit the increase button it saw the added capacity. After expanding it I then went back into vCenter and on each of the hosts in the cluster did a rescan and now they all showed the larger size. I'm guessing in the future, the 'safe' way is to shut down all the VM's first and then attempt to expand the space. But considering we've never had to do that previously this new 'feature' is somewhat of an annoyance. |